15 Useful Linux and Unix Tape Managements Commands For Sysadmins
by VIVEK GITE on OCTOBER 18, 2015 last updated MARCH 28, 2016
in COMMAND LINE HACKS, HARDWARE, HOWTO, STORAGE
Tape devices should be used on a regular basis only for archiving files or for transferring data from one server to another. Usually, tape devices are all hooked up to Unix boxes, and controlled with mt or mtx. You must backup all data to both disks (may be in the cloud) and the tape device. In this tutorial you will learn about:
- Tape device names
- Basic commands to manage tape drive
- Basic backup and restore commands
Why do you need backups?
A backup plan is necessary for you to backup your files on a regular basis. If you choose not to back up your own files, you risk losing important data. A backup allows you to:
- Ability to recover from disk failure
- Accidental file deletion
- File or file system corruption
- Complete server destruction, including the destruction of on-site backups due to fire or other problems
- Hard drives and SSD do crash
- Viruses and ransomware can corrupt or delete files
You can use tape-based archives to backup the whole server and move tapes off-site.
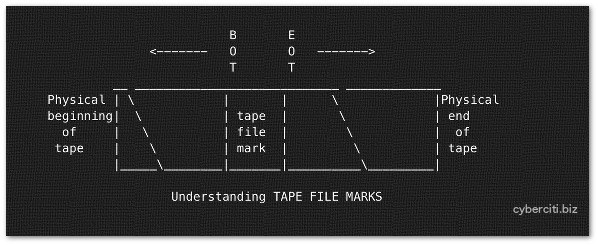
Understanding tape file marks and block size
Fig.01: Tape file marks
Each tape device can store multiple tape backup files. Tape backup files are created using cpio, tar, dd, and so on. However, tape device can be opened, written data to, and closed by the various program. You can store several backups (tapes) on physical tape. Between each tape file is a “tape file mark”. This is used to indicate where one tape file ends and another begins on physical tape. You need to use mt command to positions the tape (winds forward and rewinds and marks).
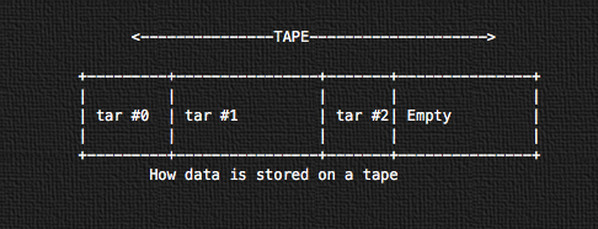
How is data stored on a tape drive
Fig.02: How data is stored on a tape
All data is stored subsequently in sequential tape archive format using tar. The first tape archive will start on the physical beginning of the tape (tar #0). The next will be tar #1 and so on.
Tape device names on Unix
- /dev/rmt/0 or /dev/rmt/1 or /dev/rmt/[0-127] : Regular tape device name on Unix. The tape is rewound.
- /dev/rmt/0n : This is know as no rewind i.e. after using tape, leaves the tape in current status for next command.
- /dev/rmt/0b : Use magtape interface i.e. BSD behavior. More-readable by a variety of OS’s such as AIX, Windows, Linux, FreeBSD, and more.
- /dev/rmt/0l : Set density to low.
- /dev/rmt/0m : Set density to medium.
- /dev/rmt/0u : Set density to high.
- /dev/rmt/0c : Set density to compressed.
- /dev/st[0-9] : Linux specific SCSI tape device name.
- /dev/sa[0-9] : FreeBSD specific SCSI tape device name.
- /dev/esa0 : FreeBSD specific SCSI tape device name that eject on close (if capable).
Tape device name examples
- The /dev/rmt/1cn indicate that I’m using unity 1, compressed density and no rewind.
- The /dev/rmt/0hb indicate that I’m using unity 0, high density and BSD behavior.
- The auto rewind SCSI tape device name on Linux : /dev/st0
- The non-rewind SCSI tape device name on Linux : /dev/nst0
- The auto rewind SCSI tape device name on FreeBSD: /dev/sa0
- The non-rewind SCSI tape device name on FreeBSD: /dev/nsa0
How do I list installed SCSI tape devices?
Type the following commands:
## Linux (read man pages for more info) ## lsscsi lsscsi -g ## IBM AIX ## lsdev -Cc tape lsdev -Cc adsm lscfg -vl rmt* ## Solaris Unix ## cfgadm –a cfgadm -al luxadm probe iostat -En ## HP-UX Unix ## ioscan Cf ioscan -funC tape ioscan -fnC tape ioscan -kfC tape |
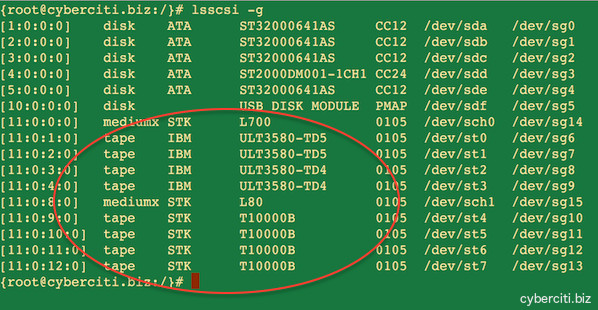
Sample outputs from my Linux server:
Fig.03: Installed tape devices on Linux server
mt command examples
In Linux and Unix-like system, the mt command is used to control operations of the tape drive, such as finding status or seeking through files on a tape or writing tape control marks to the tape. You must type the following command as root user. The syntax is:
mt -f /tape/device/name operation |
Setting up environment
You can set TAPE shell variable. This is the pathname of the tape drive. The default (if the variable is unset, but not if it is null) is /dev/nsa0 on FreeBSD. It may be overridden with the -f option passed to the mt command as explained below.
## Add to your shell startup file ## TAPE=/dev/st1 #Linux TAPE=/dev/rmt/2 #Unix TAPE=/dev/nsa3 #FreeBSD export TAPE |
1: Display status of the tape/drive
mt status #Use default mt -f /dev/rmt/0 status #Unix mt -f /dev/st0 status #Linux mt -f /dev/nsa0 status #FreeBSD mt -f /dev/rmt/1 status #Unix unity 1 i.e. tape device no. 1 |
You can use shell loop as follows to poll a system and locate all of its tape drives:
for d in 0 1 2 3 4 5
do
 mt -f "/dev/rmt/${d}" status
done
|
2: Rewinds the tape
mt rew mt rewind mt -f /dev/mt/0 rewind mt -f /dev/st0 rewind |
3: Eject the tape
mt off mt offline mt eject mt -f /dev/mt/0 off mt -f /dev/st0 eject |
4: Erase the tape (rewind the tape and, if applicable, unload the tape)
mt erase mt -f /dev/st0 erase #Linux mt -f /dev/rmt/0 erase #Unix |
5: Retensioning a magnetic tape cartridge
If errors occur when a tape is being read, you can retension the tape, clean the tape drive, and then try again as follows:
mt retension mt -f /dev/rmt/1 retension #Unix mt -f /dev/st0 retension #Linux |
6: Writes n EOF marks in the current position of tape
mt eof mt weof mt -f /dev/st0 eof |
7: Forward space count files i.e. jumps n EOF marks
The tape is positioned on the first block of the next file i.e. tape will position on first block of the field (see fig.01):
mt fsf mt -f /dev/rmt/0 fsf mt -f /dev/rmt/1 fsf 1 #go 1 forward file/tape (see fig.01) |
8: Backward space count files i.e. rewinds n EOF marks
The tape is positioned on the first block of the next file i.e. tape positions after EOF mark (see fig.01):
mt bsf mt -f /dev/rmt/1 bsf mt -f /dev/rmt/1 bsf 1 #go 1 backward file/tape (see fig.01) |
Here is a list of the tape position commands:
       fsf    Forward space count files.  The tape is positioned on the first block of the next file.

       fsfm   Forward space count files.  The tape is positioned on the last block of the previous file.

       bsf    Backward space count files.  The tape is positioned on the last block of the previous file.

       bsfm   Backward space count files.  The tape is positioned on the first block of the next file.

       asf    The tape is positioned at the beginning of the count file. Positioning is done by first rewinding the tape and then spacing forward over count filemarks.

       fsr    Forward space count records.

       bsr    Backward space count records.

       fss    (SCSI tapes) Forward space count setmarks.

       bss    (SCSI tapes) Backward space count setmarks.
|
Basic backup commands
Let us see commands to backup and restore files
9: To backup directory (tar format)
tar cvf /dev/rmt/0n /etc tar cvf /dev/st0 /etc |
10: To restore directory (tar format)
tar xvf /dev/rmt/0n -C /path/to/restore tar xvf /dev/st0 -C /tmp |
11: List or check tape contents (tar format)
mt -f /dev/st0 rewind; dd if=/dev/st0 of=-

## tar format ##
tar tvf {DEVICE} {Directory-FileName}
tar tvf /dev/st0
tar tvf /dev/st0 desktop
tar tvf /dev/rmt/0 foo > list.txt
|
12: Backup partition with dump or ufsdump
## Unix backup c0t0d0s2 partition ## ufsdump 0uf /dev/rmt/0 /dev/rdsk/c0t0d0s2 ## Linux backup /home partition ## dump 0uf /dev/nst0 /dev/sda5 dump 0uf /dev/nst0 /home ## FreeBSD backup /usr partition ## dump -0aL -b64 -f /dev/nsa0 /usr |
12: Restore partition with ufsrestore or restore
## Unix ## ufsrestore xf /dev/rmt/0 ## Unix interactive restore ## ufsrestore if /dev/rmt/0 ## Linux ## restore rf /dev/nst0 ## Restore interactive from the 6th backup on the tape media ## restore isf 6 /dev/nst0 ## FreeBSD restore ufsdump format ## restore -i -f /dev/nsa0 |
13: Start writing at the beginning of the tape (see fig.02)
## This will overwrite all data on tape ## mt -f /dev/st1 rewind ### Backup home ## tar cvf /dev/st1 /home ## Offline and unload tape ## mt -f /dev/st0 offline |
To restore from the beginning of the tape:
mt -f /dev/st0 rewind tar xvf /dev/st0 mt -f /dev/st0 offline |
14: Start writing after the last tar (see fig.02)
## This will kee all data written so far ## mt -f /dev/st1 eom ### Backup home ## tar cvf /dev/st1 /home ## Unload ## mt -f /dev/st0 offline |
15: Start writing after tar number 2 (see fig.02)
## To wrtite after tar number 2 (should be 2+1) mt -f /dev/st0 asf 3 tar cvf /dev/st0 /usr ## asf equivalent command done using fsf ## mt -f /dev/sf0 rewind mt -f /dev/st0 fsf 2 |
To restore tar from tar number 2:
mt -f /dev/st0 asf 3 tar xvf /dev/st0 mt -f /dev/st0 offline |
How do I verify backup tapes created using tar?
It is important that you do regular full system restorations and service testing, it’s the only way to know for sure that the entire system is working correctly. See our tutorial on verifying tar command tape backups for more information.
Sample shell script
#!/bin/bash
# A UNIX / Linux shell script to backup dirs to tape device like /dev/st0 (linux)
# This script make both full and incremental backups.
# You need at two sets of five  tapes. Label each tape as Mon, Tue, Wed, Thu and Fri.
# You can run script at midnight or early morning each day using cronjons.
# The operator or sys admin can replace the tape every day after the script has done.
# Script must run as root or configure permission via sudo.
# -------------------------------------------------------------------------
# Copyright (c) 1999 Vivek Gite <vivek@nixcraft.com>
# This script is licensed under GNU GPL version 2.0 or above
# -------------------------------------------------------------------------
# This script is part of nixCraft shell script collection (NSSC)
# Visit https://bash.cyberciti.biz/ for more information.
# -------------------------------------------------------------------------
# Last updated on : March-2003 - Added log file support.
# Last updated on : Feb-2007 - Added support for excluding files / dirs.
# -------------------------------------------------------------------------
LOGBASE=/root/backup/log

# Backup dirs; do not prefix /
BACKUP_ROOT_DIR="home sales"

# Get todays day like Mon, Tue and so on
NOW=$(date +"%a")

# Tape devie name
TAPE="/dev/st0"

# Exclude file
TAR_ARGS=""
EXCLUDE_CONF=/root/.backup.exclude.conf

# Backup Log file
LOGFIILE=$LOGBASE/$NOW.backup.log

# Path to binaries
TAR=/bin/tar
MT=/bin/mt
MKDIR=/bin/mkdir

# ------------------------------------------------------------------------
# Excluding files when using tar
# Create a file called $EXCLUDE_CONF using a text editor
# Add files matching patterns such as follows (regex allowed):
# home/vivek/iso
# home/vivek/*.cpp~
# ------------------------------------------------------------------------
[ -f $EXCLUDE_CONF ] && TAR_ARGS="-X $EXCLUDE_CONF"

#### Custom functions #####
# Make a full backup
full_backup(){
	local old=$(pwd)
	cd /
	$TAR $TAR_ARGS -cvpf $TAPE $BACKUP_ROOT_DIR
	$MT -f $TAPE rewind
	$MT -f $TAPE offline
	cd $old
}

# Make a  partial backup
partial_backup(){
	local old=$(pwd)
	cd /
	$TAR $TAR_ARGS -cvpf $TAPE -N "$(date -d '1 day ago')" $BACKUP_ROOT_DIR
	$MT -f $TAPE rewind
	$MT -f $TAPE offline
	cd $old
}

# Make sure all dirs exits
verify_backup_dirs(){
	local s=0
	for d in $BACKUP_ROOT_DIR
	do
		if [ ! -d /$d ];
		then
			echo "Error : /$d directory does not exits!"
			s=1
		fi
	done
	# if not; just die
	[ $s -eq 1 ] && exit 1
}

#### Main logic ####

# Make sure log dir exits
[ ! -d $LOGBASE ] && $MKDIR -p $LOGBASE

# Verify dirs
verify_backup_dirs

# Okay let us start backup procedure
# If it is Monday make a full backup;
# For Tue to Fri make a partial backup
# Weekend no backups
case $NOW in
	Mon)	full_backup;;
	Tue|Wed|Thu|Fri) 	partial_backup;;
	*) ;;
esac > $LOGFIILE 2>&1
|
A note about third party backup utilities
Both Linux and Unix-like system provides many third-party utilities which you can use to schedule the creation of backups including tape backups such as:
- Amanda
- Bacula
- rsync
- duplicity
- rsnapshot
See also
- Man pages – mt(1), mtx(1), tar(1), dump(8), restore(8)


