Solved: DHCP Service Cannot Start Access is Denied. (Windows 10/8/7)
https://www.wintips.org/how-to-fix-dhcp-service-cannot-start-access-is-denied/
If you cannot connect to the Internet using the WiFi, or LAN network, because the DHCP Client service cannot start and you get the "Error 5: Access is Denied" in the Event log, then read this tutorial to fix the issue.
The problem "Could not start the DHCP Client service on Local Computer. Error 5: Access is denied" can happen on any Windows based computer (with Windows 7, 8 or 10 OS) after upgrading Windows or after a malware infection that has compromised permissions on the DCHP Client service or on any other service that is required from the system to access the Network and the Internet or to operate smoothly.
When the DHCP service is stopped (or cannot be started), you face the following symptoms/problems on your device:
1. You receive the error message "Windows could not start the DHCP server service on local computer Error 5: Access is denied" in Event Viewer.
2. Your Network Connection (WiFi or LAN) doesn't work.
3. You get a red X on the network icon which indicates that your network connection is not working.
4. You get a yellow exclamation mark on the network icon, that you have Limited Access on the Network.
5. You cannot access the Local Network or the Internet ("No Internet Access" or "Limited Access").
How to FIX: DHCP Service Cannot Start: Access is Denied (Windows 10/8/7)
Step 1. Scan for Viruses/Malware.
Viruses or malicious programs can cause your PC to work abnormally. So, before you continue to troubleshoot your problems, use this Malware Scan and Removal Guide to check and remove viruses or/and malicious programs that may be running on your computer.
Step 2. Modify DHCP and TCPIP Registry Permissions.
The first method to resolve the "DHCP Cannot Start – Access Denied" problem, is to grant full control permissions to "NETWORKSERVICE" and to "NT SERVICE\DHCP" objects, at the following keys: DHCP & TCP/IP/. To do that:
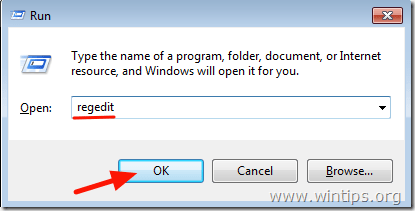
1. Simultaneously press the Windows ![]() + R keys to open run command box.
+ R keys to open run command box.
2. Type regedit and press Enter.
3. At the left pane, navigate to this key:
- HKEY_LOCAL_MACHINE\SYSTEM\CurrentControlSet\Services\Dhcp
4. Right click on the DHCP key and select Permissions.
5. Click Add, type network service and click OK.
6. Click Add again, type nt service\dhcp and click OK.
7. Select the 'NETWORK SERVICE' and check the Full control box to grant NETWORK SERVICE full control permissions on the DHCP key and click OK.
8. Select the 'Dhcp' and check the Full control box to grant "Dchp" full control permissions on the DHCP key and click OK.
9. Then navigate to the following key:
- HKEY_LOCAL_MACHINE\SYSTEM\CurrentControlSet\Services\TcpIp
10. Perform the same steps (4-8) and give full permissions to "NETWORKSERVICE" and to "NT SERVICE\DHCP" on the TCPIP key.
11. When done, close registry editor and restart your PC.
12. After the restart, check if the "DHCP Client cannot start" error is resolved. If not, then continue to next step.
Step 3. FIX "DHCP Client: Access Denied" error from command line.
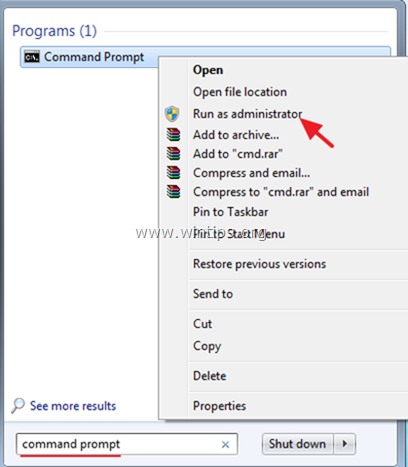
1. Open an elevated command prompt {Command Prompt(Admin)}. To do that:
a. In the Search box type: cmd or command prompt
b. Right click on the command prompt (result) and select Run as Administrator.
2. In command prompt, type the following command to add the "NT Authority\Local Service" to Administrators group and press Enter:
-
NET LOCALGROUP administrators "NT Authority\Local Service" /add
3. When done, give this command to reset Winsock Catalog to a clean state and press Enter:
-
netsh winsock reset catalog
4. Reboot your computer, as instructed and then test your Internet connection.
That it! Let me know if this guide has helped you by leaving your comment about your experience. Please like and share this guide to help others.


